Friday, 1 April 2011

Eyes animation

The eyes are basically made of sphere. The model of eyes was completed. And the next step is to make the animation.


Drag a Circle and align at the left eye, in the Front view, and adjust the position of left view. The Circle as a target for the eye.

Go to the motion panel, under the Assign Controller highlight rotation, there is a small box below the Assign Controller label, which had click it. Click the label and pick Look at Constraint. Scroll down the motion panel to the Look at Constraint section, click on Look at Target. Now connect the eyes with the point helper, a line will appear. However, the pupil jumps to a different place. Hence, select Look At Axis is used to correct this. 


The right eye used same way of left. Next, I drew a large Circle, and link to two small circle. In order to the two eyes can be controlled individually, also can be controlled together.

Saturday, 26 March 2011

Create Bones, Skin, Weight value and Deformers


Select the Create Systems Biped menu command and drag in place of perspective viewport.
Select Classic from the Body Type drop-down list.

And set the number of links used to represent the body parts follows:
Neck Links: 1
Spine Links: 4
Leg Links: 3
Fingers: 5
Finger Links: 3
Toes: 1
Toe Links: 3

Select the bones, click Figure Mode in the beneath the ‘biped’ plan in the Motion to modify the bones.
Set the ‘center’ bones in place the pelvis for the mouse in the Front View.

Select the toes in place for the mouse.
Select bones and modify in place for the model by Move. And make all bones and the mouse to match by Select and Uniform Scale.
  

The modification in order: each spine, clavicle, upper arm in left, forearm in left, hand and finger in left.
Then select Past Posture Opposite after click Copy Posture after click Create Collection button in the Motion.
Select Paste Posture Opposite button to copy the left bones.
(Motion – Copy/Paste – Create – Copy Posture – Paste Posture Opposite.)


Skinning&Envelope
Select the model and chosen the Physique from Modifier List. And click the Envelope under physique.
Used the Move tool to move the point of bone that edited the sharp of envelop. And Rotate the bone according the sharp.


Before the work, I select the model and clicked to clear the option of Show Frozen in Gray. Then, select freeze selection.

Monday, 21 March 2011

Mapping for character

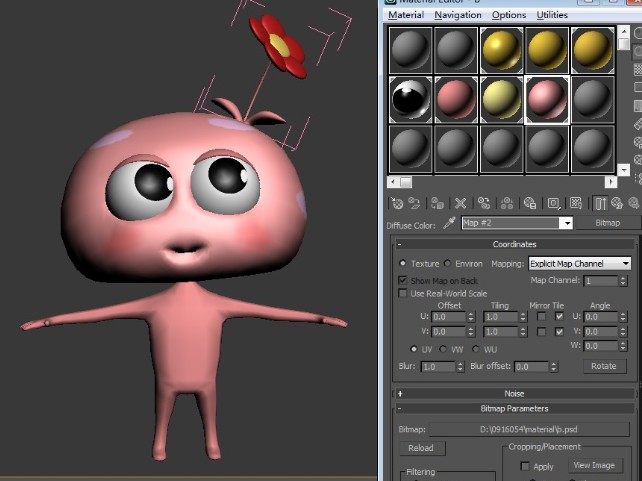
The map of character used the material that I designed by Photoshop.

 And then I selected the Unwrap UVW through the modifier list.

In order to set the cheek coincide with the pink colour, I tired adjusted the face of mushroom on the edit UVWs panel.


The body of the character I adjusted the colour with Material Editor.


The eye mapping was made before.


The pink mushroom map method in same way of the yellow mushroom. The different that the flower on the head. The colour of flower set on the modeling step, the object colour was set to red and yellow.

Saturday, 19 March 2011

other parts & other mushroom modelling


I make the other mush through copy the first one and give some modify.


The first mushroom was adorned with a little mushroom. And this one adorned with a flower.
The plate made also used Lathe. And the food made used the line and extrude. After that, group it.


The flower made of five Spheres. And the scape made with line that the thickness modifies to larger.

The leaf I created with a box, and use the Extrude and vertex adjusted to make the sharp. Symmetry used to mirror the model. And final used the TurboSmooth to make it smooth. Group it.


The scene of outdoor
The out scene is house looked like mushroom. And at the back of house is a slopes. The modeling is sample that like the character model. But the mapping and colour set are really important I think. Gradient be used to make looked more nature. And I were tried many material due to chosen of a most suitable for grass and flower.


Conclusion
During the whole process of modelling, Editable Poly, that functionality under it such as Vertex, Edge, Border, Polygon, Extrude, Cut, Collapse, etc have been frequently and repetitively applied to adjust the shape and link two elements together. Symmetry modifier acts as a mirror. And in the process of modeling, the TurboSmooth applied to shown the model after smooth, and I could be used it to adjusted the sharp better. As well as, the tools of Lathe and Reactor are used to scene modeling.

Wednesday, 16 March 2011

Environment modelling

The scene of play is indoors. And in my designed that include a table, chair, window and some table wares.

The table created start with a line. Firstly, I drew the line according the outline of the half table in the left view. And then, in order to smooth I would adjust the sharp through Bezier. Now, get a sooth curve. The curve is really important, because it is conditional on the sharp of table.
Next, I used the Lathe tools and set the Segment to 34 that looked smoother and set Align as Min align. Here, the sharp shown on frustum of a cone.


The table cloth made by Reactor.
The first step, a plan and a cylinder dragged on the top view, and adjusted the size. The cylinder used to act the size of table-top.

The second step clicked the cylinder and selected RBCcollection on the Reactor toolbar. Next, clicked the plan and selected the ‘apply the clot modifier’.

And then, the properties panel of reactor cloth displays the left. The mass, friction, density and resistance etc set as default. After that, add the cloth collection for the plan. And there is important that click the ‘Avoid Self-intersection’.


The third step I set the animation of the plan move from top by auto key. And then, clicked the preview window, see the process of plan drop. And click the play/pause through Simulation to record the point of time that the plan looked like table cloth. I select the Create Animation and move the time bar, pause it, and right click the plan chosen the Convert to Editable Poly.


At final, delete the cylinder, and align to the central column of table that be finished before.


The chair modeling
The chair modeling started with the line created. Drew the line and adjusted the sharp look like the side of chair. After that, select the Spline and chosen the Extrude through the Modifier list and reduce the amount of extrude.


The wine cup modelling
The wine cup modelling by Lathe. The method same as table made.
Drew a line and modify the sharp. There are different that in order to make the cup has thickness, the line could be made as:

Next, I created the wine on the cup. Also use Lathe, started with line drawn and adjusted.

And move and set the model into the cup, as well as group it.


And then, use the Lathe tool to make the sharp of cup.

But here has a point need take attention that the line adjusted should be alignment of the two centre points.